17/08/2013

Wardrobe Basics

Being a student and always on a tight budget I am constantly on the lookout  for ways to get the most out of my wardrobe with minimal pieces. These pieces are great as they are trend friendly (you can always introduce prints, textures and cuts to the look) so you don't find yourself getting a new wardrobe every season.

Basic Tops
These basic colours will match most things in your wardrobe and can be done up or down


White Top From Glassons


Black Top From Glassons


Grey Top From Glassons

Basic Pants
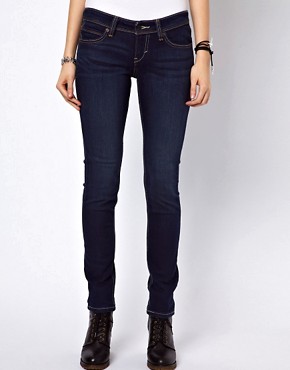
Skinny is the way to go as you can put them into boots and they fit your frame well.

Image 1 of Levi's Low Curve Id Demi Curve Skinny Jeans

Dark Wash Jeans From Levi's

Image 1 of Levi's Low Curve Id Demi Curve Skinny Jeans

Medium Wash From Levi's 

Image 1 of Levi's Demi Curve ID Black Skinny Jeans

Black From Levi's


Jumpers/ Sweaters/ Cardigans


Image 1 of Glamorous Aran Knit Boyfriend Cardigan

Blue knit cardigan to transition from the seasons
Asos

Image 1 of ASOS Skater Mac With Belt

Invest in a nice black coat as they never go out of trend
Asos

Image 1 of ASOS Cropped Blazer In Ponte

A blazer for more formal occasions
Asos

Image 1 of Coopers for ASOS Black Wax Biker Jacket

A casual and neutral jacket to go with everyday wear
Asos

Dresses
Buy dresses which are versatile and can be worn both during the day and night


Alchester Dress


Lace pink dress
Pagani

Image 1 of ASOS Mini Bodycon Dress With Short Sleeves.

Simple black dress
Asos

Bags
Go for neutrals as they match almost everything.


Brown Satchel
The Cambridge Satchel Company

Image 1 of Fiorelli Jasmine Triple Compartment Bag

Fiorelli Jasmine Triple Compartment Bag

Shoes
Image 1 of River Island Goldie Side Fasten Boots
River Island Goldie Side Fasten Boots

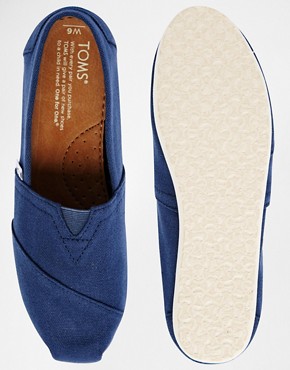
Image 3 of TOMS Classic Canvas Flat Shoes

Toms

Image 3 of Dune Jewel Tan Gladiator Sandals

Dune Jewel Tan Gladiator Sandals


Forres Brogue Boot
Jack Wills

Accessories 
Go wild here as these are the most adaptable to the trends/seasons.

Image 1 of Cath Kidston Kentish Rose Wool Scarf

Cath Kidston Kentish Rose Wool Scarf

Image 1 of Beta Queens Guard Scarf

Beta Queens Guard Scarf
Image 1 of Minkpink Hear Me Roar Waisted Belt

Minkpink Hear Me Roar Waisted Belt

Image 1 of ASOS 15' Laptop Case in Aztec With Pom Pom

Aztec laptop case

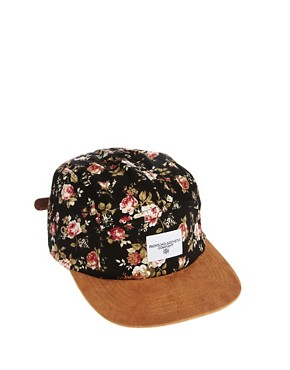
Profound Aesthetic Floral Snapback Cap

11/08/2013

Crunchy Lemon Muffins


Ingredients:

2 cups self raising flour
3/4 cup sugar
75g butter
1 cup milk
1 egg
grated zest of 1 large or 2 medium sized lemons
1/4 cup lemon juice
1/4 cup sugar

Preheat oven to 200c for 10 minutes. Place rack just above the middle of oven. Coat 12 muffin holes with baking spray. Stir flour and place in a large bowl. Add first measure of sugar and using a fork, toss.
Put butter in a small microwave proof bowl and microwave until melted but not hot. Add milk, egg, lemon zest then whisk with fork until combined. Tip mixture into dry ingredients.
Mix gently using flat bladed stirrer until dry ingredients are dampened but mixture looks rough. Spoon mixture into muffin holes. Bake for 10 minutes until tips lightly browned and springs back.
While muffins bake, use small bowl to put juice and second measure of sugar. Use a pastry brush to apply sugar and lemon to hot muffins in their pan.


03/08/2013

Review: Macadamia Natural Oil Hair Mask


From the first glace this hair mask looks very rich creamy and lathering and I can honestly say it performs in the exact same way. The tropical coconut themed packaging reflected the smell as it smelt very fresh and floral-fruity.

The Macadamia Natural Oil Hair Mask can be purchases in two sizes 250g and 500g (I believe I have the smaller one) and requires only a pea size during application. It is a great investment as this product will last you a very long time, most likely over 6 months. This product is a bit pricy compared to other hair masks on the market today, however has definitely proved to be worth it. Since the first use I noticed a very big difference in my hair, not only did it smell amazing and have a shine, it made my hair so much easier to brush out and worked amazing as a detangler. I have long dark two textured hair and I can say it noticeably controlled the frizz in my curls without making them look greasy as well as create locks in my wavier sections. I followed the directions on the package and left it into clean damp hair for 7 minutes once a week. I combed it in however felt i had a lot of hair fall? However i'm sure this is because i don't usually comb my hair in the shower :/

Overall i am in love with this product and will definitely consider repurchasing it. I will continue using this product and maybe do a post later on during the year to update my feelings towards it.

Until then be sure to stay updated with our other reviews!


27/07/2013

Lush Products Review


A couple weeks ago I went out into town and popped into Lush - I couldn't resist! I picked up a couple of bath items, Melting Marshmallow Moment Bath Melt and Karma Bubble Bar. Then last week I picked up the Jackie Oates Colour Supplement to use as a concealer/foundation. Here's a little review on the products!
Melting Marshmallow Bath Melt - I actually googled how much of this I was meant to use, and I found out you could use half or the whole thing, so I chose to use half because I wanted value for money here! I popped half in, and it melted after about 5 minutes. It smelled very yummy, but in all honesty it didn't last long! I feel like I would have needed to use a whole one. They aren't the cheapest things ever, so it was slightly disappointing.

Karma Bubble Bar - I've used about 3/4 of this Bubble Bar so far. The first time I used it, I crumbled about half into the bath into hot running water. My first impression wasn't that great because the bubbles don't last long at all! I would say they only last five minutes before they disappear partly or fully. I feel like you might need to use a whole bar for a decent bubble bath like the bath melt, and at $8.90 a bar, that ain't so good! Like all Lush products, this bar smelled really nice but I think it needs to be more long-lasting or cheaper for me to purchase again.


Jackie Oates Colour Supplement - I have a really, really hard time finding a light shade of tinted moisturiser/BB cream or light coverage that doesn't make me look orange or darker than my pale skin tone. I have tried this for a few days so far more as a concealer (covering spots, red marks around the nose and chin area and my t zone). So far I have found that it's a great base for people with fairer skin tone, and while it's a teeny bit drying and not very moisturising, it's good for colour and makes my complexion look a little more glowing. I'd advise pairing it with a good moisturiser on the dry bits of your face because I've found while it's good for my cheeks (which aren't dry), other areas such as my chin and forehead need more moisturisation because it's not as easy to apply.

I hope you've enjoyed reading these reviews. I'd love to review some more products when I stop by the store again sometime.


24/07/2013

Lemon Slice

Hello! It's Emma here, and today I'm going to show you how to make lemon slice!


For the pastry base:

125g softened unsalted butter
1/2 cup icing sugar
1 teaspoon vanilla essence
1 and 1/2 cups self-raising flour
1 teaspoon grated lemon zest

For the lemon filling:

3/4 cup plain flour
1/2 teaspoon baking powder
3/4 cup ground almonds
3 eggs
1 cup caster sugar
3/4 cup lemon juice
2 tablespoons grated lemon zest
icing sugar to dust at the end

Firstly preheat the oven to 180c and grease and line a 16 x 26 cm slice tin. I'd advise using a little butter to grease the tin and then the baking paper will stick firmly into the square shape as it sticks to the sides.


Beat the butter (ideally leave out for a couple hours to soften or heat in the microwave in 10 second bursts - but make sure it doesn't melt!) and icing sugar in a mixing bowl until pale and creamy, then add the vanilla essence.


Stir in the self-raising flour and 1 teaspoon grated lemon zest (remember to leave 2 teaspoons for the filling). Press mixture into prepared tin. Bake for 15 minutes or until golden.


Press mixture into prepared tin. Bake for 15 minutes or until golden. While it's baking, you'll have enough time to do the filling.


Sift the plain flour and baking powder in a bowl and then add the ground almonds. In a separate bowl, as pictured beat together the 3 eggs, caster sugar, lemon juice and the 2 tablespoons of grated lemon zest. Stir the egg mixture into dry ingredients. If you want a smoother mixture and no lumps of flour, add the wet mixture in parts.


If there are any lumps in the mixture, mix it more until all gone. Allow 5 minutes for the base to cool down from the oven, and then pour mixture over the base.


The original recipe says to bake the slice for 20 minutes or until firm, but I found it takes more like 50 minutes to fully cook through the middle. Ovens may vary, so I'd advise to check around the half hour mark.


The crust is buttery and crumbly, and the filling should be moist and full of lemon flavour. If you've enjoyed this post, let me know if there's any other baked goods you'd like me to do.

16/07/2013

Best Bakes

Peanut Butter Oatmeal Choc Chip Cookies


This was my first time making these cookies, and oh my golly god they turned out amazing! If your eyes aren't convinced just yet then you better make these and let your taste buds decide...

Makes around 22 medium sized cookies

Ingredients

1/2 C Softened Butter
1/2 C Brown sugar
1/4 C White Sugar
1 Egg
1 Tsp Vanilla
1/2 C Peanut Butter (Chunky or Smooth)
1/2 Tsp Baking Soda
1/2 C Rolled Oats
1 1/4 C Flour (more or less)
1 C Choc Chips
1/2 C Chopped nuts (optional)

Method

1. Mix the sugars, egg, vanilla and butter until combined


2. Add peanut butter and soda and mix again (if you can melt the peanut butter, this will allow it to mix easier)

3. Add the oats then mix


4. Add the flour gradually, you want a soft dough that is not sticky. Add more flour until the right consistency


5. Mix in the choc chips and nuts


6. Roll the dough into the size of a ping pong ball then flatten in between your palms.


7. Bake at 180 Degrees Celsius for 10 min (more or less)


BEST EATEN WHEN WARM!